How to Make a Shipping Envelope from a Cereal Box

Today I'm going to show you how to make your own shipping envelopes using materials you have at home. Since my shops on Etsy are built around using ecofriendly upcycled materials, it only makes sense that my shipping materials also follow these lines. Reusing is the easiest way to be ecofriendly for shipping materials.
You can make these mailers any size you wish, as long as you follow your region's postal guidelines. For example, you can see Canada Post's guidelines for nonstandard lettermail here. I usually make two sizes of mailers from cereal boxes: to fit my round and oval coiled mats. I want to keep my items safe in the mail, so it is important to use a sturdy mailer, but I also want to keep shipping costs to a minimum, so I try to eliminate any unnecessary weight as well.

Materials and Tools:
- Cereal box, or other similar packaging material
- Cutting tools, options include:
1. a paper trimmer
2. rotary cutter and acrylic ruler
3. utility knife and metal ruler
4. scissors
5. cutting mat if using #2 or #3
- Bone folder or teflon folder or other scoring tool
- Double sided tape
- Sewing machine
Steps:
1. Open the seam in your box and flatten the box.

2. Determine the finished width and height of your mailer.
3. Trim the top and bottom of the box off to the measurement for the width. Here I use either my rotary cutter or my utility knife because my paper trimmer can't cut through more than one layer of box board.

4. Open out your box. Using your measurement for the finished height, trim one side to this measurement (see red arrow above). Here I can use my paper trimmer through the single layer.

5. Fold your box again on the fold you just measured from and trim off the other side of the box to make your flap. I usually cut the flap 5cm (2") long (see red arrow above). Again, here I can use my paper trimmer through the single layer.

6. Turn your mailer inside out so the blank side is now on the outside.

7. Using a wide zigzag stitch and an old needle in your sewing machine, stitch down the two open sides of your mailer, backstitching at both ends. I try to use up all my nearly empty spools and bobbins of thread for this step, and don't care what colour I use. Remember not to sew the flap edge closed!
*If you don't have a sewing machine, you could use paper tape or packing tape for this step.

8. Trim off any thread ends. Your post office won't be too happy if long threads get caught in their sorting equipment.
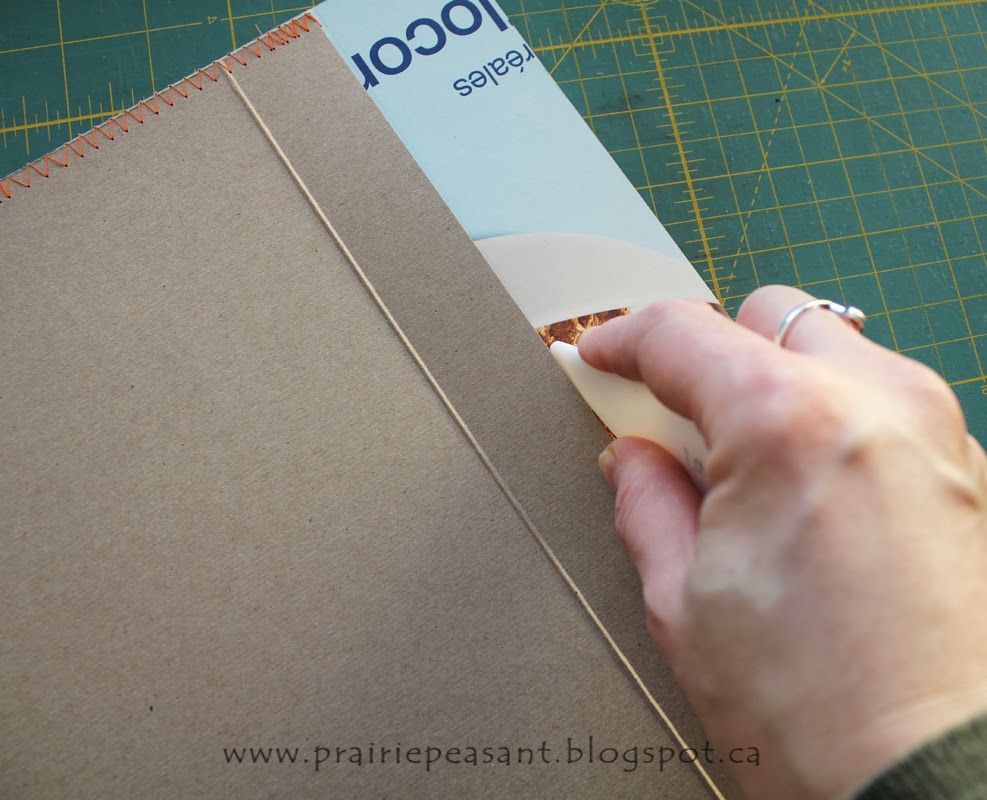
9. Using your bone folder or other scoring tool, score along the flap edge, using the shorter side as your guide. I like to score it on both the front and the back to help the flap fold over nicely.

10. Use double sided tape along the flap edge to seal the envelope when you are ready. It is easiest to store your mailers flat at this stage.

11. When you are ready to use your mailer, fold the flap over and seal with the double sided tape. You can also decorate your mailer with doodles or rubber stamps or any other ideas you have.
With these mailers, I'm able to keep the thickness of my package to less than 2 cm so they fit through the Slot of Doom, and can be shipped as nonstandard lettermail from Canada, keeping my shipping costs down for my customers!
Do you have any packaging tips to share? I'd love to hear from you in the comments!


great tutorial!
ReplyDeleteThanks Brenda!
DeleteThis is great, thanks!
ReplyDeleteI also re-use stuff for my mailing. Amazon in UK send books and stuff in nice card mailers that are designed to fold up to fit various sizes of book. I open them out, turn them round so the print is on the inside and pack my books in them, fixing it all with parcel tape.
I also bought a great little "Recycle" symbol stamp from Skull and Crossbuns, which I use to stamp on packages with dark green ink. Looks fab!
Thank you for this really good idea - I'll be saving up cereal boxes now.
Thanks Lizzie! Great idea to reuse the Amazon mailers--I get a few of those too. I like your idea for the recycle stamp as well!
DeleteFantastic tutorial and great upcycling/reusing project! And gotta love that these mailers will fit through the slot of doom! :D
ReplyDeleteThanks Tawny! These would work for some of your products too. I know you like recycling as much as I do, do you make your own shipping envelopes too?
Delete