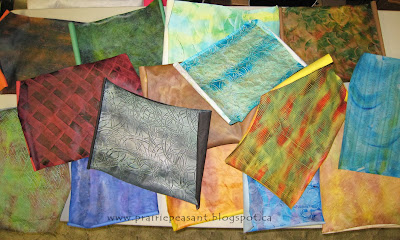
Paste Paper Fun
I had a very fun play day with some friends several weeks ago where we made paste papers.
We used the recipe for cornstarch paste from Lili's Bookbinding Blog here, and added a little bit of glycerin to it to make it a little more flexible.
After laying out all our tools and supplies on Vivian's kitchen counter, we were set to go!
Lots of colours to choose from!
Our favourite tool was a blow dryer diffuser. Look around your house, and you never know what you might find to use!
We tried some different papers, including road atlas maps and index pages from large atlases--they both worked well.
We also tried "printing" by laying a clean sheet of paper on top of a wet sheet, and peeling it back. I found the second sheet picked up the print well, but the original lost quite a bit of definition, so I redid the first one.
If you don't have a drying rack, the sheets can take quite up a bit of floor space while drying! These are all the papers I made, and V and M made just as many.
As they dried, the edges curled. This is easily remedied by ironing between two sheets of plain paper (see how flat the papers are in the first photo).
I plan on using my papers for journal endpapers, like these two which have already found new homes. I'm looking forward to another Paste Paper day with some other friends in January!


They look so beautiful! I have some that I still need to iron from a couple of months back, hope they'll still go flat!
ReplyDeleteThanks Lisa, they are so much fun! I think yours will still flatten if you iron them.
DeleteHow colourful -and what fun! Like play-school for grown-ups!
ReplyDeleteThanks Lizzie! I wish I took more time just to play! Adults need a little more of just plain ol' play time.
DeleteHi Laura, thanks for posting, I missed you!
ReplyDeleteBeautiful, marvelous paster paper, how good to see them!!
I hope I can try this technique soon, too.
Always inspiring, dear.
Happy New Year to you and your family.
Lucia
Thanks for stopping by Lucia! I think you'll have a lot of fun when you try this yourself!
ReplyDeleteWow! That looks like a really cool process and such fun learning a new thing!
ReplyDeleteIt's like the adult version of finger painting and lots of fun! But I bet your kids would love it too, Tawny!
Delete